How to Make a Page Landscape in Google Docs: A Comprehensive Guide
Google Docs is a versatile tool for creating and editing documents, but sometimes you need more control over page orientation. Knowing how to make a page landscape in Google Docs can be crucial for projects like brochures, wide tables, or presentations. This guide will walk you through the various methods to achieve landscape orientation in your Google Docs, ensuring your documents look exactly as you intend. We’ll cover everything from simple section breaks to more advanced techniques, providing clear, step-by-step instructions for each.
Understanding Page Orientation in Google Docs
Before diving into the how-to, it’s essential to understand how Google Docs handles page orientation. By default, all pages in a Google Doc are set to portrait. Changing the orientation affects the entire document unless you use section breaks to isolate specific pages. This allows you to have a mix of portrait and landscape pages within the same document.
The ability to manipulate page orientation is particularly useful when working with visual elements that benefit from a wider format. For instance, charts, large images, or tables with numerous columns often look better in landscape mode. Understanding this flexibility will significantly enhance your document creation capabilities.
Method One: Using Section Breaks to Change Page Orientation
The most effective way to make a single page landscape in Google Docs is by using section breaks. Section breaks allow you to divide your document into distinct sections, each with its own formatting. Here’s how to do it:
Step-by-Step Guide to Inserting Section Breaks
- Position Your Cursor: Place your cursor at the end of the page *before* the page you want to be in landscape.
- Insert a Section Break: Go to Insert > Break > Section break (next page). This creates a new section starting on the next page.
- Position Your Cursor Again: Now, place your cursor at the end of the page you want to be in landscape.
- Insert Another Section Break: Again, go to Insert > Break > Section break (next page). This isolates the page you want to change.
Changing the Page Orientation of the Isolated Section
- Select the Section: Click anywhere on the page you want to be in landscape.
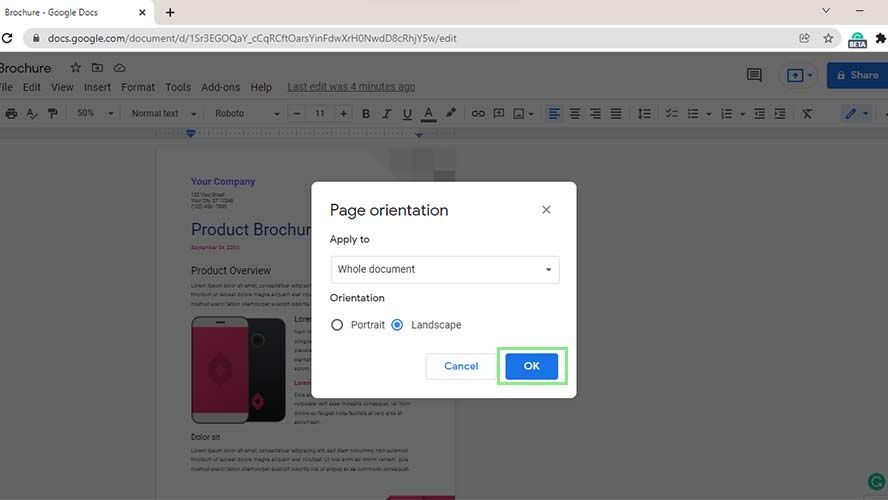
- Go to Page Setup: Navigate to File > Page setup.
- Change Orientation: In the Page setup window, under the “Orientation” section, select “Landscape”.
- Apply to Section: Crucially, in the “Apply to” dropdown menu, choose “This section”. This ensures that only the selected section is affected.
- Click OK: The selected page should now be in landscape orientation, while the rest of the document remains in portrait.
By using section breaks and specifying “This section” in the Page setup, you can effectively control the orientation of individual pages within your Google Doc. This is the most reliable method for precise control over page layout.
Method Two: Using Tables as a Workaround
While section breaks are the preferred method, there’s another technique that can be useful in specific situations: using tables. This method is particularly helpful if you only need to display content in a landscape format without actually changing the page orientation.
Creating a Landscape Table
- Insert a Table: In your Google Doc, insert a table with one row and one column (1×1).
- Adjust Table Size: Drag the sides of the table to make it wider than it is tall, mimicking a landscape orientation.
- Add Your Content: Insert your text, images, or other content into the table cell.
- Rotate the Table (If Needed): While Google Docs doesn’t natively support table rotation, you can create the content in a separate application (like Google Drawings), rotate it there, and then insert it as an image into the table. This gives the *appearance* of landscape content.
- Remove Table Borders: To hide the table borders, right-click on the table, select “Table properties,” and set the border color to white or 0pt.
This method doesn’t actually change the page orientation, but it allows you to display content in a landscape-like format. It’s a useful workaround when you need a quick solution without altering the overall document layout.
Method Three: Using Google Drawings for Visual Elements
For documents that heavily rely on visual elements like diagrams or infographics, using Google Drawings can be an effective approach. Google Drawings allows you to create and manipulate visuals in a landscape format, which you can then embed into your Google Doc.
Creating Landscape Visuals in Google Drawings
- Open Google Drawings: Go to Google Drive and create a new Google Drawing (New > Google Drawings).
- Set Page Size: In Google Drawings, go to File > Page setup and choose a landscape orientation. You can select a predefined size or enter custom dimensions.
- Create Your Visual: Design your diagram, infographic, or other visual element within Google Drawings.
- Insert into Google Docs: Once your visual is complete, go back to your Google Doc and go to Insert > Drawing > From Drive. Select the Google Drawing you created.
The visual will be inserted into your Google Doc as an image. You can resize and position it as needed. This method is ideal for incorporating complex visual elements that require a landscape format.
Troubleshooting Common Issues
Sometimes, changing page orientation in Google Docs can lead to unexpected results. Here are some common issues and how to resolve them:
- Incorrect Section Breaks: If the wrong pages are changing orientation, double-check your section breaks. Ensure they are placed correctly at the beginning and end of the page you want to affect.
- Applying Changes to the Whole Document: If you accidentally apply the landscape orientation to the entire document, go to File > Page setup, select “This document” in the “Apply to” dropdown, and change the orientation back to portrait. Then, reapply the changes to the specific section.
- Formatting Issues: Changing page orientation can sometimes affect the formatting of text and images. Review your document carefully and adjust the layout as needed.
Best Practices for Using Landscape Pages
Here are some best practices to keep in mind when using landscape pages in Google Docs:
- Plan Your Layout: Before you start, plan which pages need to be in landscape and which should remain in portrait. This will help you insert section breaks correctly from the outset.
- Use Consistent Formatting: Maintain consistent formatting throughout your document, even when using different page orientations. This will give your document a professional and polished look.
- Review Your Document: Always review your document after making changes to ensure that everything looks as intended. Pay close attention to page breaks, formatting, and the placement of images and tables.
Conclusion
Knowing how to make a page landscape in Google Docs is a valuable skill that can significantly enhance your document creation capabilities. Whether you’re working with tables, charts, or visual elements, being able to control page orientation gives you the flexibility to create professional and visually appealing documents. By using section breaks, tables, and Google Drawings, you can effectively manage page orientation and create documents that meet your specific needs. Remember to plan your layout, use consistent formatting, and always review your document to ensure that everything looks as intended. With these techniques, you’ll be able to master page orientation in Google Docs and create documents that stand out. [See also: Google Docs Tips and Tricks] [See also: Advanced Google Docs Formatting]
